The following is a guest post from regular contributor, Kalyn at Creative Savings.
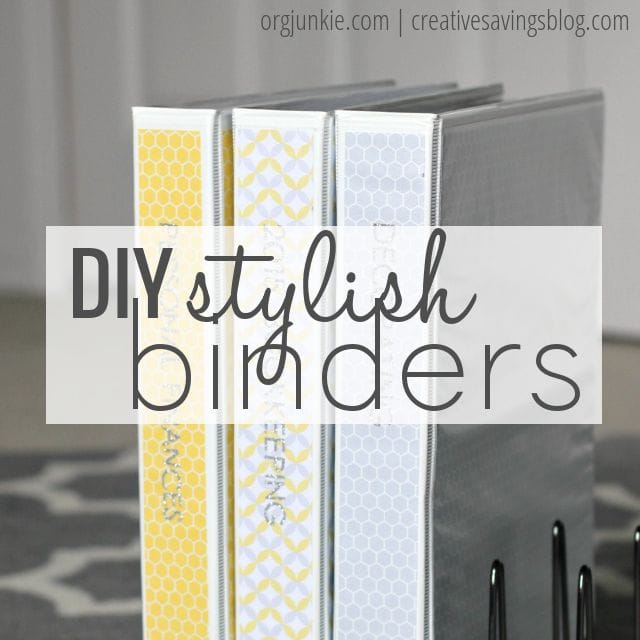
Binders and notebooks are the ultimate solution to my organization anxiety.
Any time I have paper clutter lying around, or ideas I don’t want to forget, I start a binder for that topic and organize it with inserts, page protectors, and tabs. It might sound a little like overkill to some, but it really helps me organize my finances, home management papers, and even hundreds of those cutouts from magazines!
Currently, I’m in the midst of decorating my home office, and was tired of the mismatched look of my current binder collection. But one look through the aisles of Target, and those cute patterned binders that only took seconds to fall in love with cost $8-$9 dollars a piece. No way was I paying almost $10 for a notebook, pretty or not!
So, I decided then and there I would just make my own, and placed an order on Amazon for plain white binders with plastic sleeves (affiliate link) immediately. Then I drove to the nearest craft store and picked up a pretty selection of scrapbook papers that matched my current color scheme.
The result is instant binder love, and now I can’t wait to do this to ALL my notebooks!
Supplies Needed:
- Plain 1.5″ notebooks with sleeves
- 12×12 scrapbook paper {2 of each pattern per notebook, and the thicker the paper, the better}
- X-acto knife
- Pencil
- Paper cutter
- Ruler
The Project:
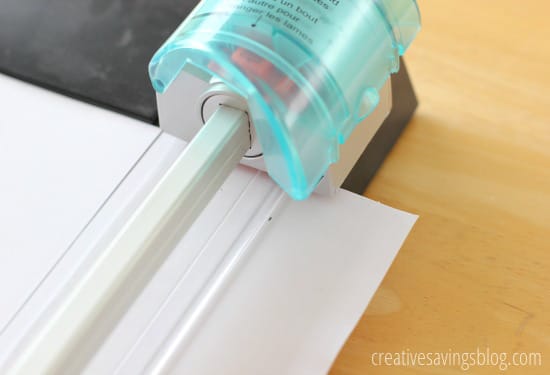
Step 1: Cut each piece of scrapbook paper 10″ wide by just over 11″ tall with a paper cutter.
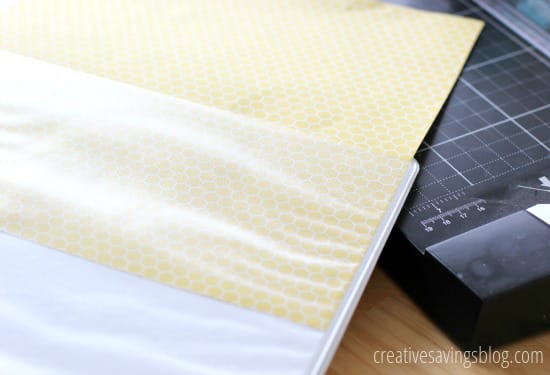
Step 2: Carefully slip each piece of paper into the front and back sleeves, pushing gently until the paper makes it’s way all the way to the bottom.
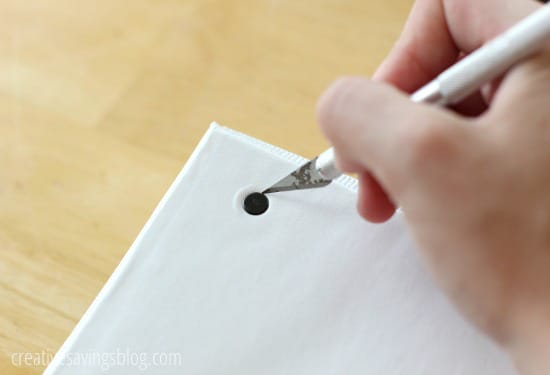
For the back sleeve, you will need to use an X-acto knife to separate the two holes where the plastic binds itself to the notebook. Be very careful with your slits so you don’t create an extra large hole! If you’d like, you can cover the holes with plain or decorative reinforcement stickers (affiliate link).
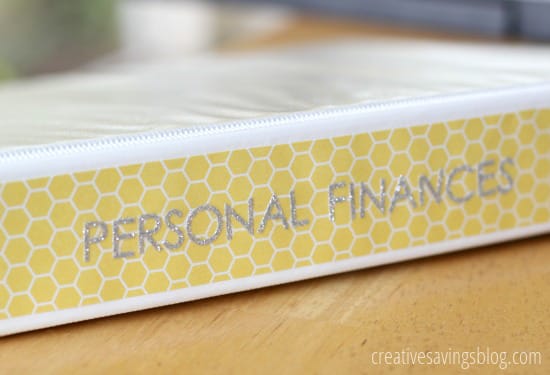
Step 3: Take one of the long strips of paper you previously cut for the spine and trim it width-wise to 1.5″. Use any letter stickers to label or decorate the spine, then carefully slip the paper into the spine sleeve, pushing gently until the paper makes it’s way to the bottom. The spine is probably the hardest part because it’s so thin and the paper can bunch up easily if you’re not careful.
Step 5: Fill notebook with your paper goodies and display on a shelf, table or cabinet. You may also want to buy a dish rack to help display them without falling over. I can’t remember where I first saw this idea, but it was absolutely brilliant!
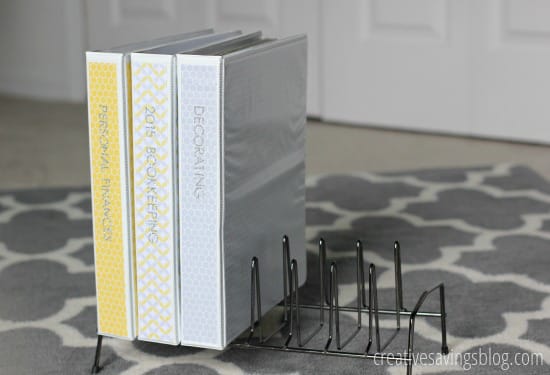
Now I don’t have to be embarrassed anymore about my mismatched 3-ring notebooks, and they almost act as their very own decor piece in my office.
Plus, they cost under $4 each for the notebook, scrapbook paper, and decorative letter stickers — which is half the price of ones you can find in store. And those ones are not nearly as customizable as these pretty and functional pieces. When I finally get sick of my yellow and grey color palette, I can easily switch them out to match my new decor!
What do you like to organize with 3-ring binders?


Kalyn Brooke is a full-time writer and blogger at CreativeSavingsBlog.com, where she gives a fresh perspective on frugal living, and the kick-in-the-pants you need to create a budget from scratch. She lives in beautiful Southwest Florida with her news-photographer husband and the most adorable bunny you’ve ever seen. She loves making to-do lists, reading good books, eating chocolate peanut butter ice cream, and pursuing big dreams….all carefully planned out, of course.
Where did you get the stand for the notebooks?
It looks like a kitchen baking sheet organizer to me. But I love the whole idea.
Hi Laura! Isn’t this a great idea? She stated that this is a dish rack.
quote: “You may also want to buy a dish rack to help display them without falling over. I can’t remember where I first saw this idea, but it was absolutely brilliant!”
I’m definitely going to buy a dish rack for this. This is so stylish and clever!!!
Super clever!!
I think I grabbed this one at Target!
Can you show a picture of the back of the binder, especially where you cut out the hole?
Love this idea!!
So pretty! I’m definitely trying this! I like to use binders for everything, too. They’re great for organizing appliance manuals if you use the clear plastic 3-ring protectors.
I hadn’t thought about the appliance manuals before, but that’s a great idea! They are becoming way to bulky in my filing cabinet.
Thank you Kalyn Brooke for you’re brilliant ideas! I am an office supply queen, lol. I have a big U-shaped desk and everything. I was searching for some binders and was looking for only the stylish ones they sell in the office supply stores. They weren’t of high quality. I love the idea of using craft paper for boring white binders. Oh, and the dish rack is absolutely genius!!! I will have to buy several of those. Where did you get the dish racks? Maybe I can search Walmart.
I got the dish rack at Target, and I am with you on the office supplies! I have a whole box full of post it notes but of course, I keep buying more. 🙂
Hi,
Love this idea and I want to take all my loose recipes and put them in nice binders as they will sit on open shelves. Katlyn, with all the scrapbook paper out there, I am having the toughest time finding pastel patterns like you are showing. I see Etsy sells really nice digital papers but don’t want the hassle of then figuring out how to print them on physical 12×12 paper as it gets costly. Can you tell me what 12×12 scrapbook paper you used or something close to it. Thanks for terrific idea!!