The following is a guest post, about upright freezer organization tips, from regular contributor, Rachel.
Last time I was here, I wrote about a simple solution for utilizing the empty space inside a side-by-side kitchen freezer. Today, I thought it fitting to continue with more talk about upright freezer organization tips.
I added freezer organization to my spring cleaning list this year. Gotta make room for those summer popsicles and homemade treats. 🙂 Here’s the basic method I followed for organizing a standard side-by-side;
- empty the freezer in stages
- tidy up and/or condense the partially used items
- group similar items together
- containerize with freezer friendly bins
Step 1: Empty the Freezer in Stages
I divided my freezer into 3 segments (the top half, the bottom half, and the door items) and only emptied one segment at a time so nothing was sitting outside the freezer for too long. I’m a deliberate decision maker (aka slow) and didn’t want to pull everything out at once for fear they would melt while I contemplated the best strategy. This step is important because it also helps identify surplus ingredients, starts the like-with-like sorting stage, and shows what type of containerization will be needed.
Step 2: Tidy Up and/or Condense Items
Good grief! Do you know how many bags of partially used green peas I had in the back of my freezer?!! And I’m the only one in the family who likes peas – ha!
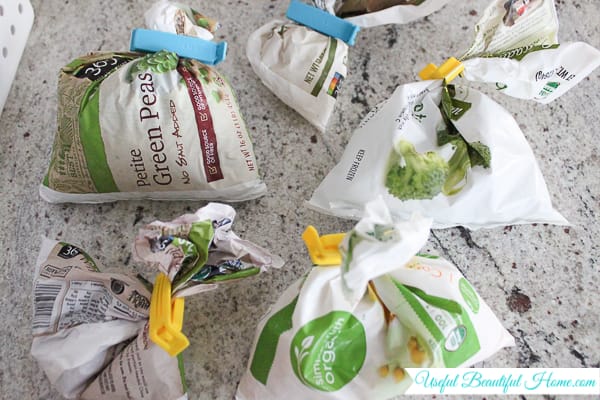
Displaying my fragmented stash on the counter made it easier to condense the bags of peas together and get rid of the excess baggie clutter. This step goes hand-in-hand with Step #3. As you tidy up the scraggly items begin separating into similar groupings and your organization efforts will go even faster.
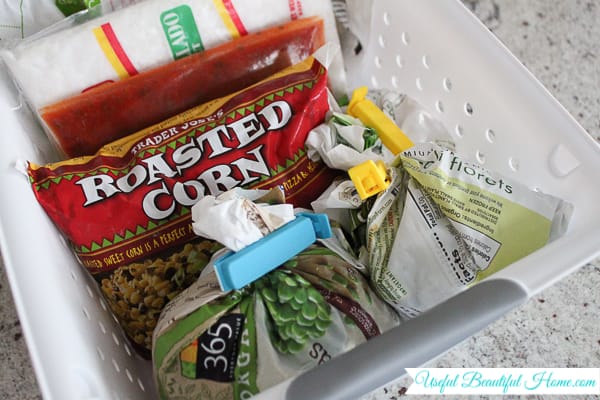
Step 3: Group Similar Items Together
This is what makes your freezer shine! It’s much easier to find those silly peas when they’re located in the same freezer zone as all the other vegetables. No more wasted time searching… no more duplicate purchasing. Like-with-like is such a familiar concept and beneficial even in the freezer!
Step 4: Containerize
My favorite part! Keep all those frozen grouping you organized in one easy to reach location. For a side-by-side freezer, I used a common Sterlite product (pictured below) to contain my goodies. If you order them online via Amazon they come packs of 6 or individual count.

I like these Sterlite bins because they fit my freezer dimensions and they were sitting unused at the bottom of my pantry. Why buy more when you can use something already on hand?!! Always shop your house before purchasing more storage containers!
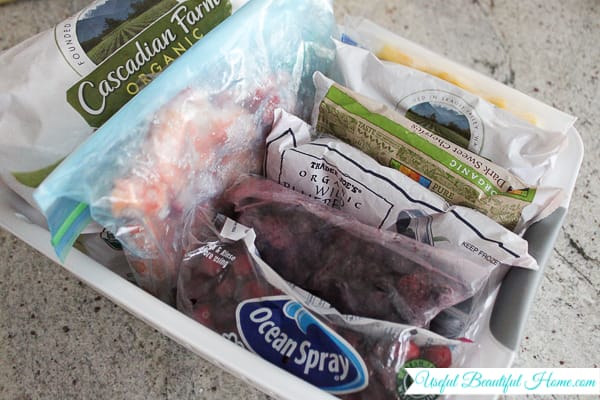
Keep in mind, I’m not dealing with a deep-freezer. So, these plastic bins have no trouble holding up to the chilly life of a typical kitchen freezer. If it helps, I’ve been using them for many months and have not had any cracking or breaking issues.
And, don’t forget my other container trick I recently shared HERE. It’s another low cost, easy fix for freezer organization.

Continuing on the topic of containers, remember to fully use the existing built-ins. The door is a great space to keep the random things that don’t have similar items for grouping together. For example, chilled mugs, specialty ice creams, and even fish oil supplements (FYI freezing them helps reduce the fishy flavor a little!). Oh, and that little red & white box you see in the picture below contains freezer labels. I keep them in the door so they’re always where I need them, when I need them.
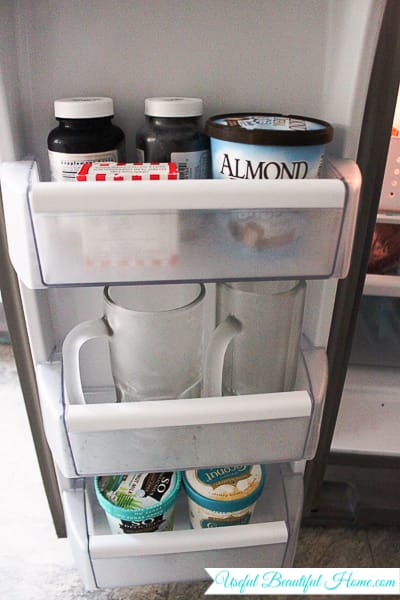
Finally, I use the bottom freezer drawer for a very specific purpose… raw meat. From a health standpoint, it’s important to keep raw meats towards the bottom of your refrigerator and freezer if possible (especially the refrigerator!). Doing this keeps potential bacteria found in meat liquids and/or products away from items that don’t require cooking, like frozen berries. Any liquids that might escape before fully frozen will only drip or pool on the bottom surface NOT on your smoothie ingredients. It’s also helpful if you loose power for any length of time and your freezer ingredients begin to melt around the edges. The melting drips won’t contaminate other edibles.
If you’re on a spring cleaning mission like me, don’t forget the freezer! I understand everyone’s needs are uniquely different according to your family but regardless of your arrangement, organizing the freezer will ultimately SAVE YOU TIME AND MONEY!
I could go on and on about the freezer. Turns out, there are many ways to organize this compact space. For those who are asking, I’m not finished with the topic yet. I’ll be back with suggestions for labeling the revolving inventory inside your freezer. I’m also working on organizing a top freezer/refrigerator combo per a few requests. As soon as I finish raiding a friend’s top freezer, I’ll get it posted here at OrgJunkie!

In the professional world, I’m a nurse by trade. But, around our house, I’m known as Mommy to our young daughter. My goal is to share what I’ve implemented in my home to inspire you with fresh ideas and to encourage you to keep up the good work in yours!
Related post:
Quick Tips for Organizing the Deep Freezer
I don’t have an upright freezer but I still really like your idea of using containers for like items. I live in a 2 bedroom apartment and my freezer is pretty small but I think these containers will help A LOT with organizing it.
I’m with Vanessa, my freezer is pretty tiny too and these little baskets are a great idea! I think this weekend will be Freezer Sort Weekend!
I also use baskets, but prefer more shallow ones. We also have a garden, so I freeze lots of produce and it’s even more important to keep things organized so my work doesn’t go to waste. I package the produce in sandwich or quart sized bags and then put each kind of produce in 2 gallon freezer bags to keep like things together and then in the baskets.
Another thing I’ve found that is important is to keep a running tally sheet posted on the freezer after I’ve cleaned, organized, and INVENTORIED. Even our 13 year old knows to put a tally mark on the list when we take something out. I highlight the item that is down to 1 meal or 1 package on the list. When it’s time for grocery shopping, I just look for the highlighted items.